
Knitting is all about pulling a loop of your yarn through the loops that are already on your needle. If you pull the loop through the back to the front it’s called a knit stitch, if it goes through the front to the back, its called a purl stitch.
The only other things you need to know is how to get some stitches (or loops!) onto the needle in the first place – this is called ‘casting on’ and then get them off again, ‘cast off’ when you have finished.
When it comes to choosing your yarn and needles, I would go for a smooth double-knit yarn when you first start and use the yarn label as a guide – that’s the mm size by the crossed needle image.
Ok – are you ready to learn?
The Slip Knot
Whether it be knitting or crochet you need to start with a slip knot to get the yarn onto your needle. To create one of these …..

1. Cross the yarn coming from the ball over the yarn end (tail) to form a circle.

2. Pop the circle you have just made over the yarn which is coming from the ball.

3. Pick up the yarn that lies under the middle of your circle with your needle and pull it through to form a loop.

4.Gradually tighten your loop to form the knot by pulling your yarn ends firmly.

Remember to make sure your completed slip knot can slide easily along your needle.
Casting On
1. Push the tip of your right hand needle through the centre of your slip knot loop which is on your left hand needle.

2. Take your yarn behind the needles and wrap it under and around the right hand needle. You may need to use your left hand to stabilise both your needles!

3. Use the tip of the right hand needle to draw, or ‘tickle’ the drapped yarn through the loop on your left hand needle.


4. Place the loop you have just made onto the left hand needle. The easiest way to do this is by inserting the tip of the left needle from right to left through the front of the loop you have just made. You should now have 2 stitches (your original slip knot and the stitch you have just made) on your left hand needle.


5. Repeat this process by working into the stitch you have just cast on until you have the number of stitches you need. I’ve made 10 in the picture below.


The Knit Stitch
When you first learn to knit, some people find that a rhyme helps them get into the rhythm and remember the steps – I’ll be referring to this one as I take you through my photo guide.

1. Once you have cast on your stitches (I’ve gone for 10) put the needle with its cast on stitches into your left hand and take your other empty needle in your right. Keep your yarn to the back of your knitting. Push the tip of your right hand needle in through the centre of your first stitch from front to back.
For those using a knitting rhyme to help remember the steps this is “In through the front to knit a stitch“.

2. Take your yarn behind the needles and wrap it under and around the right hand needle. You may need to use your left hand to stabilise both your needles! This is the “Wrap your yarn around the back to hitch” line of the rhyme.

3. Use the tip of the right hand needle to draw, or ‘tickle’ the drapped yarn through the loop on your left hand needle. This corresponds to “Catch the loop as you peek back through” part of the rhyme.

4. Keep the new loop you have made on your right needle and gently slide the old loop off your left needle into the gap between your pins. For those of you using the knitting rhymes, this is “Then slide it off, away from you!“.


You should now have 1 stitch from your new row on your right hand needle and 9 (still to be stitched!) on your left hand needle. Repeat the steps above until you have 10 new stitches on your right hand needle.

 Voila! Just keep repeating this process until you have knitted as many rows as you need.
The Purl Stitch
If you like a rhyme to help you learn your stitches, here is one for the purl stitch.
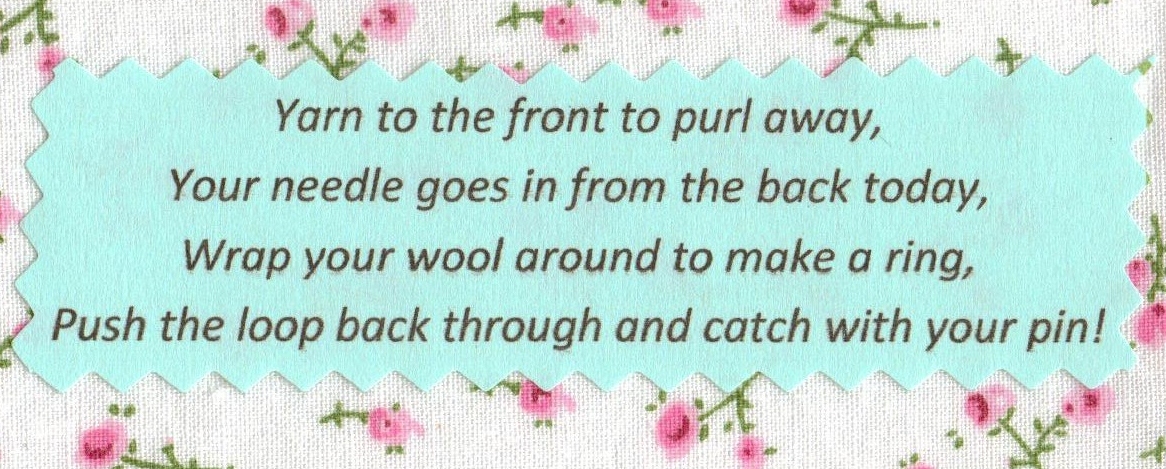
1. Once you have cast on your stitches (I’ve gone for 10), take your needle with your cast on stitches in your left hand and the empty pin in your right. Keeping the yarn in front of your work, push the tip of your right hand needle from right to left into the front of the first stitch. For those of you using a rhyme this the “Yarn to the front to purl away, your needle goes in from the back today“.

2. Wrap the yarn over and around the tip of your right needle – this is the “wrap your wool around to make a ring” section of the rhyme.


3. Here comes the tricky bit – push / tickle the yarn through the stitch on the left needle with the tip of your right needle. This is the “push the loop back through” part of the rhyme.

4. Almost there! As your right hand needle slides into your purl stitch, your old stitch on will start to pull up and drop / slip off your left needle. This action is the “catch with your pin” last part of the rhyme. You now have a purl stitch on your right hand needle!


Repeat the steps above until you have purled all your stitches onto your right hand needle. Here’s that sequence again:


Casting Off
1. Work (knit or purl) two stitches onto your right hand needle.

2. Slide the tip of your left hand needle (from left to right) through the first stitch you have just made and lift it over the second stitch and off the needle.


3. Work another stitch (again knit or purl depending on your pattern) onto the right hand needle and repeat step 2. Continue in this way until only one stitch is left on your left hand needle.


4. Break off your yarn, about 20cm from the last stitch, and remove your needle. Pass the end of the yarn through the last stitch and pull it gently to close the loop.

Your casting off is finished!

Thanks! I will definitely mention your blog to them. However, they are 9 -11 year olds and I am not sure what their household internet-use rules are (hence my wish to print things out rather than just refer them to the site :-).)
Completely understand. Have fun with your lessons, hope they go well. X
I am teaching a group of 7 4th and 5th graders to knit as an after school club through the PTA at my children’s school. Would you give permission for me to print some of your basic guide pages to use as handouts for the girls? I’ve made my own knit stitch tutorial page, but would love to use your casting on, casting off and purl pages.
Of course. More than happy to help. If you tell them about my blog that would be fab- I will be posting a quick and easy knitted head warmer pattern next week. X