
This is Serge, my forgotten friend, who has been hiding in the back of my cupboard for the last 2 years…..

In a bid to make my craft fair “lovelies” as efficiently as possible, I thought it was about time I got to know Serge a little better and find out just what he could do!
Incase you are keen to get acquainted with your own overlocker / serger, I have written a quick post on all Serge’s main dials and knobs to help.
The Basics: An overlocker trims and neatens the edge of the fabric – all in one go.
Tension Dials: These are normally at the top of your machine and there is a separate dial for each needle and your upper and lower looper.
Most of my normal ‘serging / overlocking’ is done on number 3.

Pressure Regulator: I can alter my foot pressure using a dial / screw on top of my serger – you can see it in the photo above. Higher pressures are used for heavyweight fabrics and lower ones for lightweight fabrics.
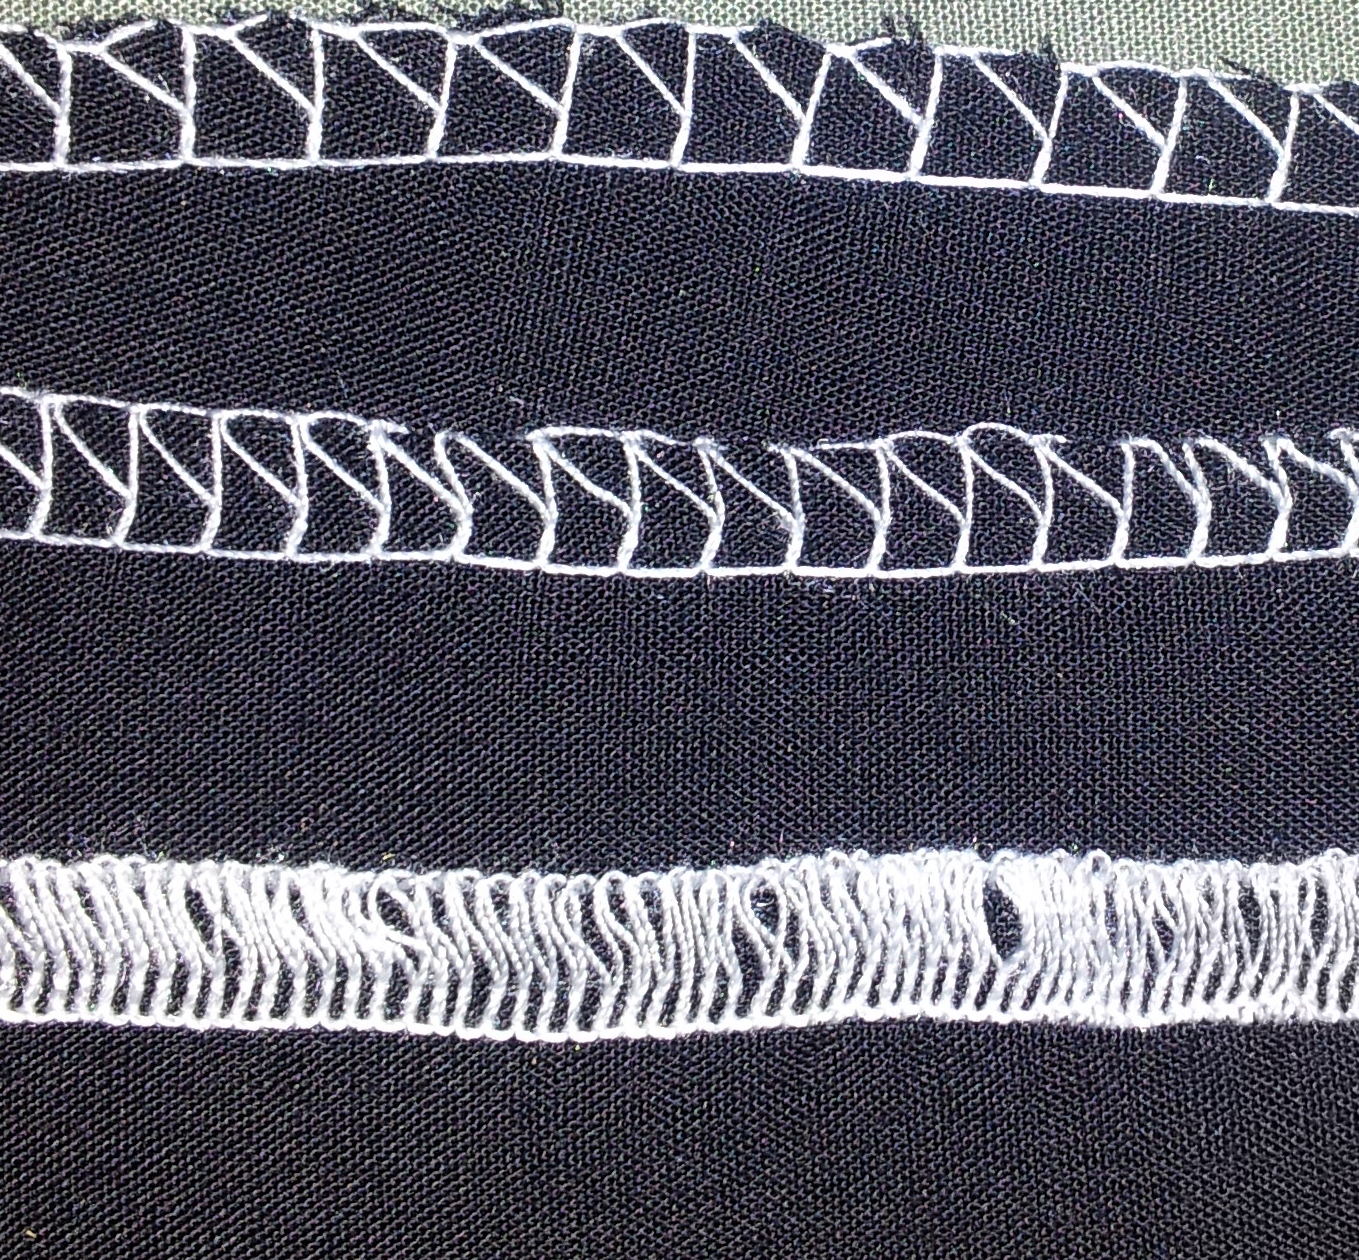
Stitch length: This is controlled by a dial on the side of my machine. The lower the number the shorter the distance between stitches, the higher the number the further apart the stitches.

I’ve done a quick demo to help you see what I’m on about. The top row in the photo shows overlocking with a stitch length setting of 5, the middle row with a setting of 3 and bottom row with a setting of 1.
Differential feed: There are normally 2 sets of teeth or feed dogs on an overlocker – with the differential feed set to 1, both sets move at the same rate and the fabric lies flat. If the feed dogs move at different rates, ie, first moves twice as fast as the second (as with a differential feed of 2) the fabric gathers.

This feature really helps if you want to ruffle a fabric. With a differential feed setting of 2, a 40 cm long straight piece of fabric was easily gathered to give this fabulous effect.

Stitch Cutting Width Adjuster: On the left hand side of my machine there is a dial which I turn to move the cutting blade either closer to, or further away from, the throat plate.

The photo on the left shows the cutting blade closet to the throat plate and the picture on the right with the blade set at its widest distance.


If the cutting width is too wide, your fabric will curl under the overlocking.

If the cutting width is too small, your stitches will hang over the edge of your fabric.

If you are 3 thread serging, you can alter the width of your stitch by selecting which needle you use. Using the left needle will give you a wider stitch, the needle on the right will give you a narrower stitch. Altering the cutting blade position makes sure your stitches are aligned to the fabrics edge.
Needle Plate Setting (used for Rolled Hems): Stitch fingers are prongs on the throat plate (next to the feed dogs) around which the stitch is formed.

When you set the machine to sew a rolled hem, one of the stitch fingers is disengaged from use. Without this removable stitch finger (the widest one in the photo above) the stitch is narrower as there is one less prong for the lower looper to make the stitch around.
To take my chaining finger ‘out of use’, I pull the red tab you can see in the photo to the ‘R’ position. Can you see the chaining finger disappear under the throat plate? Clever!


Disengaging the knife: If you are using your overlocker for decorative sewing and do not want to cut the fabric as you sew you will need to disengage the knife.
The photo on the left shows the knife in its raised position, ready to cut and the photo on the right shows the blade lowered, out of use.


I’m off to try out some free overlocking attachments that came with my machine – I will post some more once I’ve had a play!

Thank you for sharing this awesome post. I had a Janome beehive type of serger for about 20 years until my hubby knocked it off my desk. So he bought Janome Pro 4DX love it with the extra goodies (blade width adjustment and the pressure foot adjustment) your post helped me understand how it all works in plain English. Thank you so much Val🇨🇦
REALLY GOOD, I HAVE THE SAME SERGER, BUT BEFORE I HAD TIME FOR LESSONS, WE MOVED. I UNTHREADED IT TO PACK AWAY, AND NOW HAVING A TERRIBLE TIME TRYING TO THREAD THE FIRST LOOPER.
Thank you!!! I have had 2 surfers for years and afraid to use them. For one…I can’t thread the things for beans! Anyway…this helps me understand some of my questions anyway
Glad to be of help. 🙂
Aw I love people like you who share knowledge, thank you. You totally helped my understanding of cutting width adjustment on my brand new machine. Cheers to you.
That’s great to know, so happy to be of help. Thank you for taking the time to let me know.x
Brilliant thank you
You’re welcome. Glad to be of help. X
Really helpful as although I am an experienced sewing I’m in my first month of overlocking / serging. Your post has given me confidence to jump in and learn.
Glad to be of help. x
so is the cutting width guide the same as the seam allowance guide if you don’t have those guidelines imprinted onto your serger
Tengo tiempo de estar tratando de comprender mi overlock y ni los manuales me ayudaron. gracias con su explicación todo me quedo muy claro, Y manos a la obra.
Usted es bienvenido. feliz de ayudar.
Thank you for sharing, I’ve used a serger and I really liked it. I want share experience with everyone about the use a serger.
Your illustrations and explanations are better than the three books I purchased!
Thank you so much. Great to know the post was helpful. X
googled over this post looking for some pictures.. Great post! have the same serger 😉
Thank you. X
Very informative post! Thanks for sharing. I’m sure this will help me get along better with the sergers in my life. 🙂
You’re welcome. Glad the post helped. X
Awesome! My friend gave me her mom’s old serger. It’s been sitting in the garage. Your post may just give me the courage to drag it out and learn how to use it!
I’ve been thinking about getting an overlocker for a while but they look so scary! Thank you for explaining it in a simple and easy to understand way…this is going on my wish list! X
You’re welcome. I forgot how to use mine so it helped me too to relearn!
I have got a friend called Serge and really don’t know how he works! This is a very useful tutorial, I am going to have go and reacquaint myself with my friend.
Thank you. I was a little weary of my Serge, but we are shaping up to be good friends! X
I love your tutorials and instructionals! You make me want to become a better seamstress, my sewing skills are doubtful at best.. haha. I’ve put you forth for a Liester award- you’re probably familiar with it but if not, here’s some more info:
🙂
Thank you so much for the nomination and fabulous feedback. I will get busy answering questions and nominating as soon as I get a few mins spare. Love your blog too, I’ll be a regular visitor!
You make me want to learn how to sew!!!!!!
very happy to meet serge! xxxxx