
Due to the huge response I’ve had towards my Vintage Singer Sewing Machine (now named Little Miss Susie Soul Singer due to your fab suggestions), I’m writing a post on how I cleaned her.

Little Miss Susie Soul Singer
Before I start, I need to say I’m not an expert at cleaning sewing machines, I just wanted her to look her best so I trawled the web to see what info I could find to guide me. If you want to clean or restore a sewing machine yourself, please seek the advice of a professional and not follow my lead! This post is a record of my experience rather than a ‘how to guide’.
The first thing I did after buying Little Miss Susie was to look her serial number up on this website to find out her year of ‘birth’ and model number. The International Sewing Machine Collectors Society was fab as it also tells you the info like how many of each model were made.
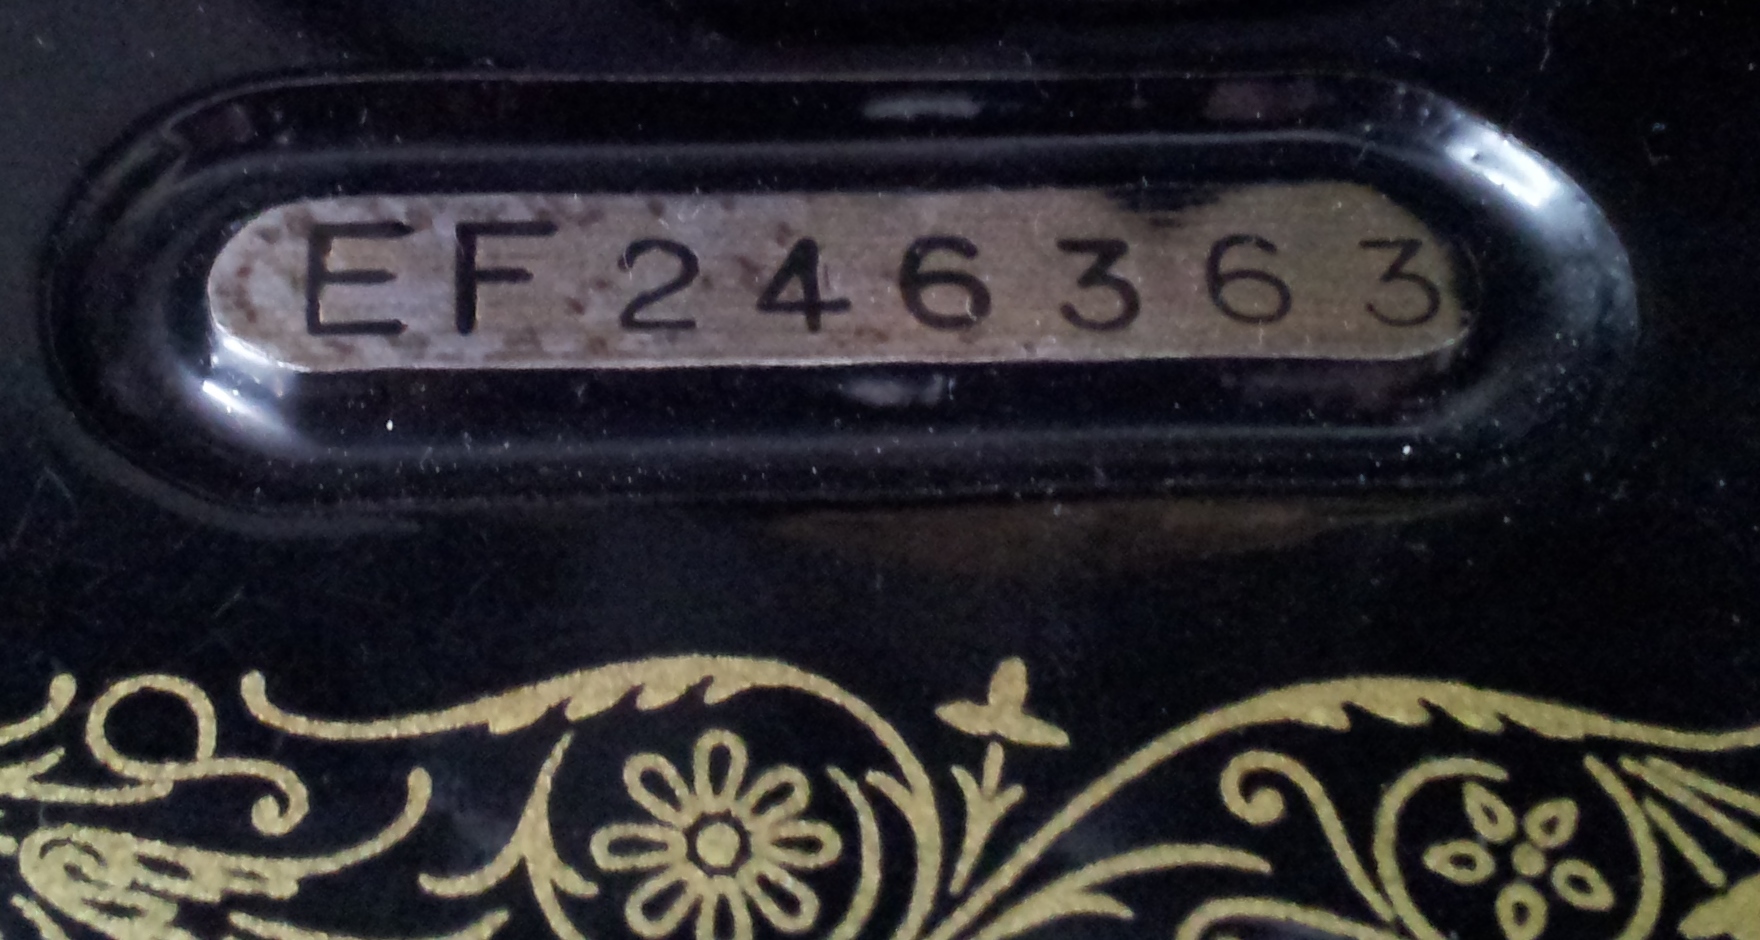
Little Miss Susie Soul Singer’s Serial Number
If you have checked out Little Miss Susie’s number you will see she is a 99K model (one of a 50,000 batch!) born July 1949.
With her model number known, the next step was to track down some info on how to clean her. I found a free pdf manual on the thefeatherweight221factory website and another at Tools for Self Reliance and grabbed myself some cleaning tools.

My Sewing Machine Cleaning Kit
With interdental toothbrushes, an old ‘normal’ toothbrush, cotton buds, soft cloths / rags, tweezers, a screwdriver and some Autosol metal polish at hand I ventured forward.
Once I had hovered out any dust from inside the case and gave the machine a gentle wipe with a damp cloth (with a tiny bit of washing up liquid), it was time to take Little Miss Susie apart.

Principle Parts of Singer from A Manual of Family Sewing Machines
First off came the face plate, then presser foot, needle clamp and screw, needle and throat plates.

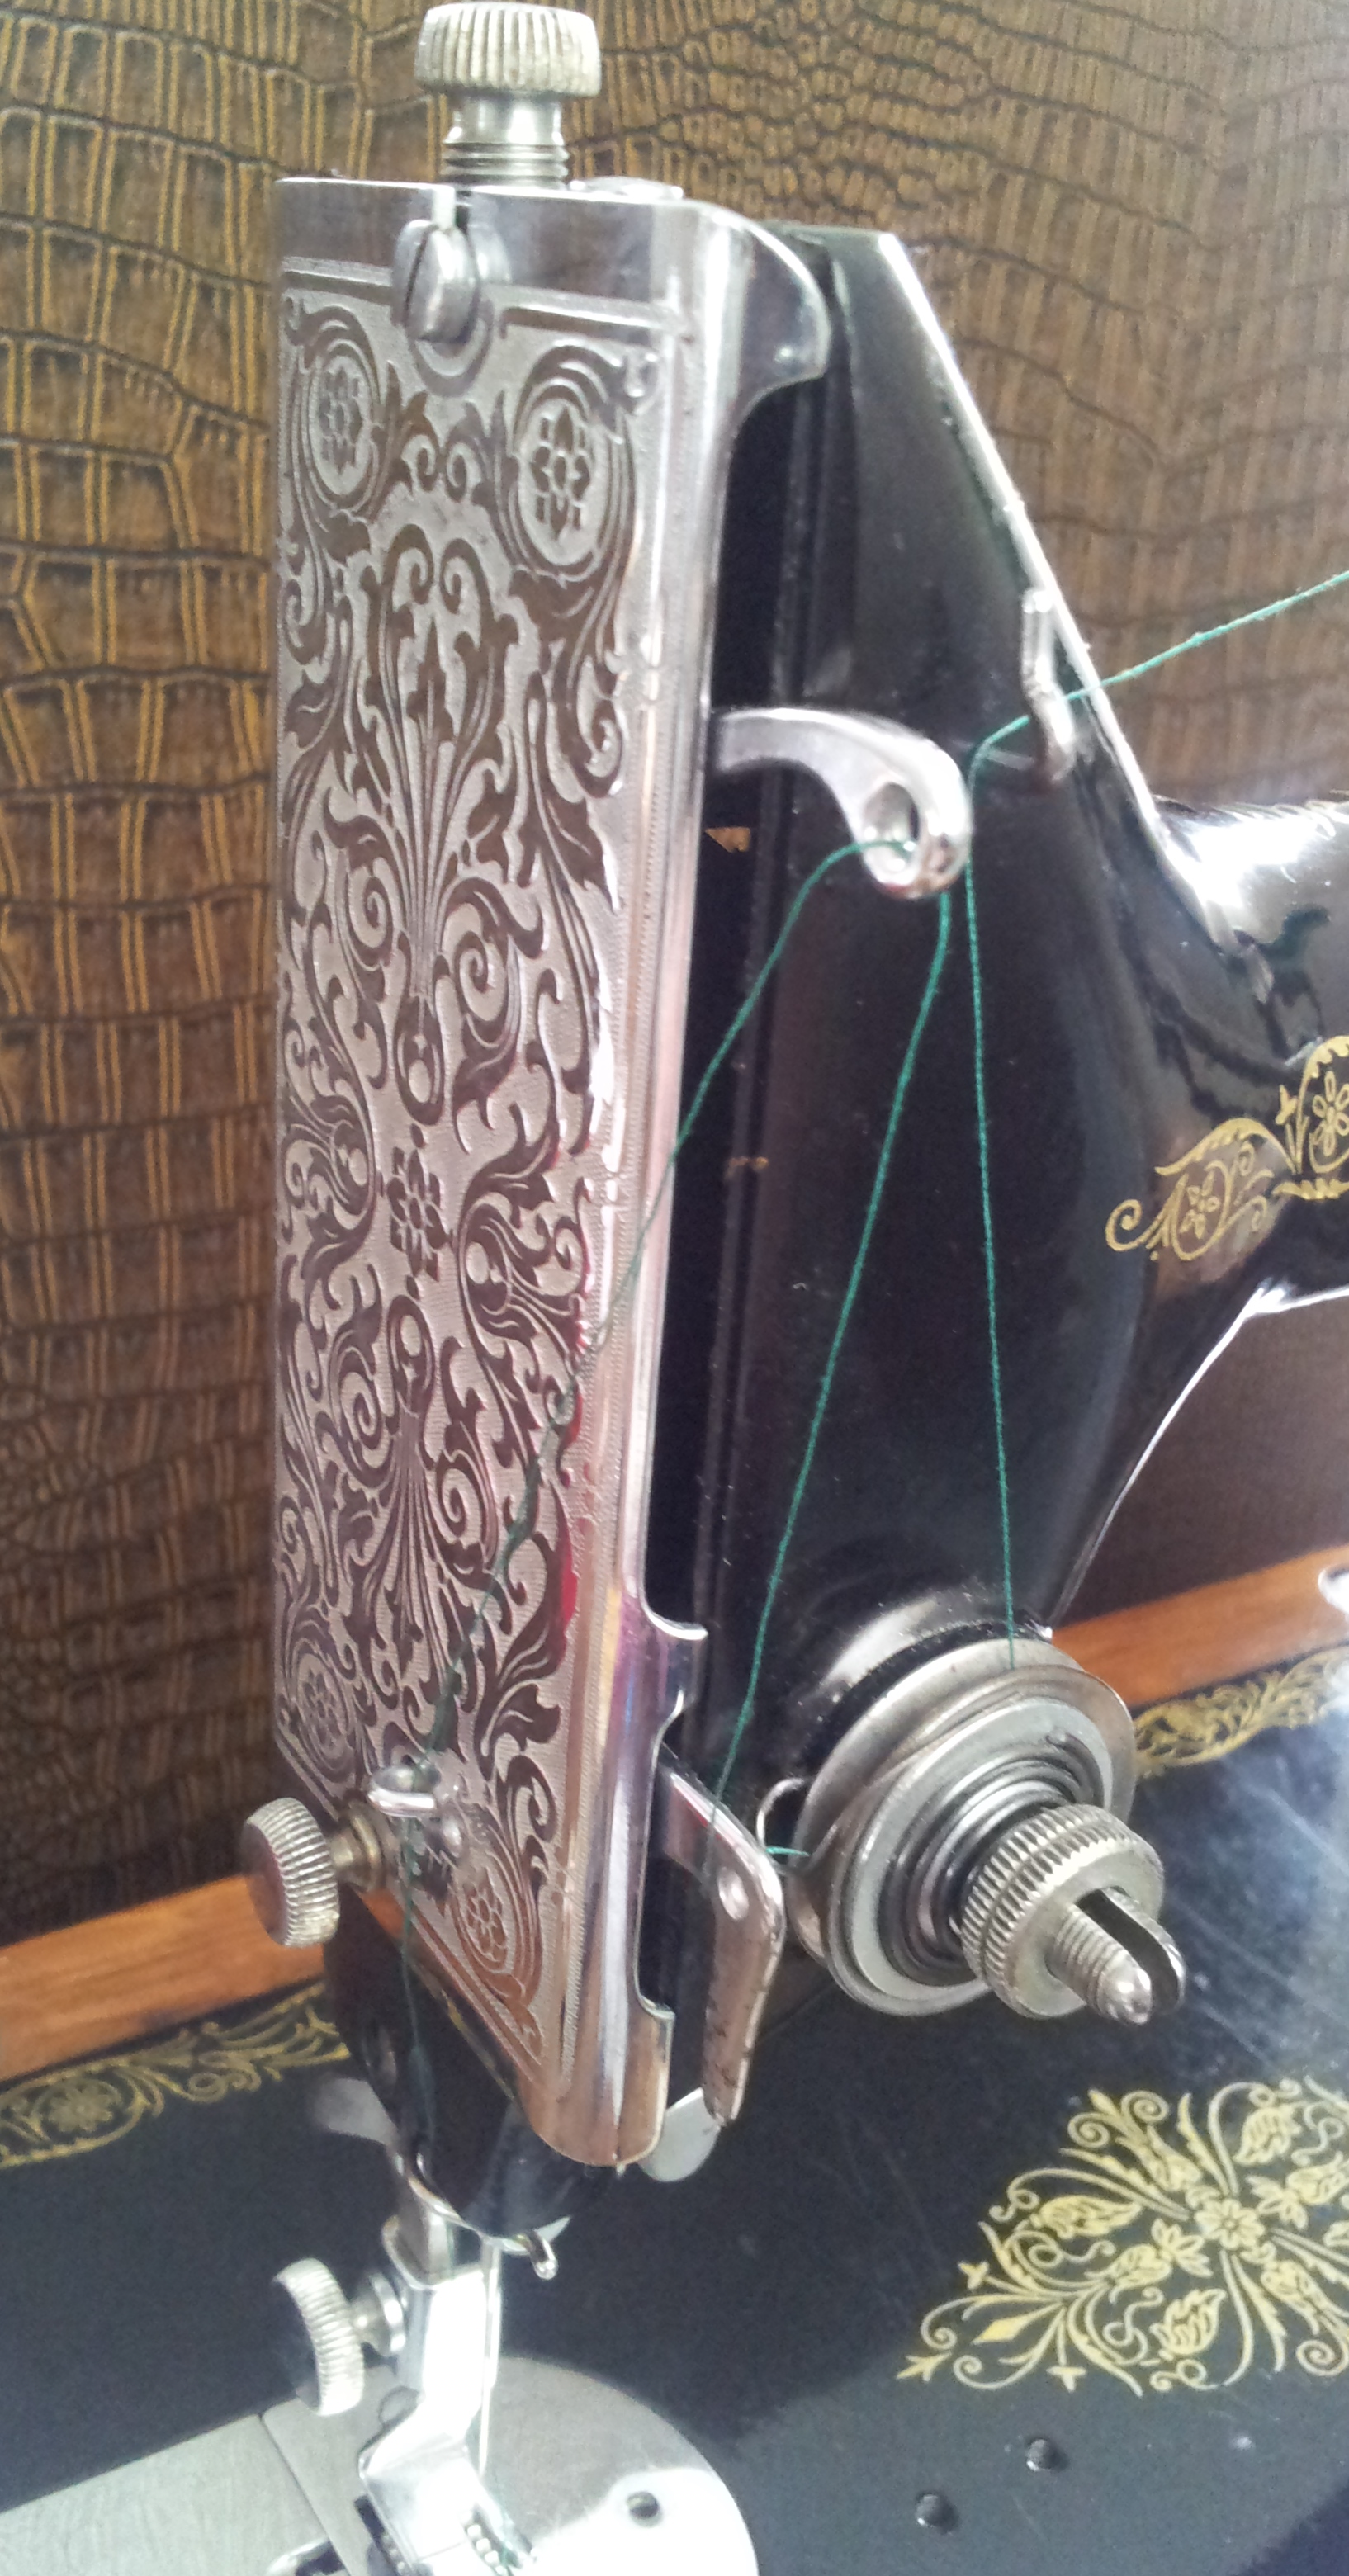
Behind Singer Face Plate
All came up lovely with some Autosol polish – photo on left below is before cleaning and to the right after cleaning.

If I were to do this again, I would definitely cover the bed of my machine with an old pillowcase as cleaning got a little messy and take even more pictures as a memory jogger so I can easily remember where all the bits went!

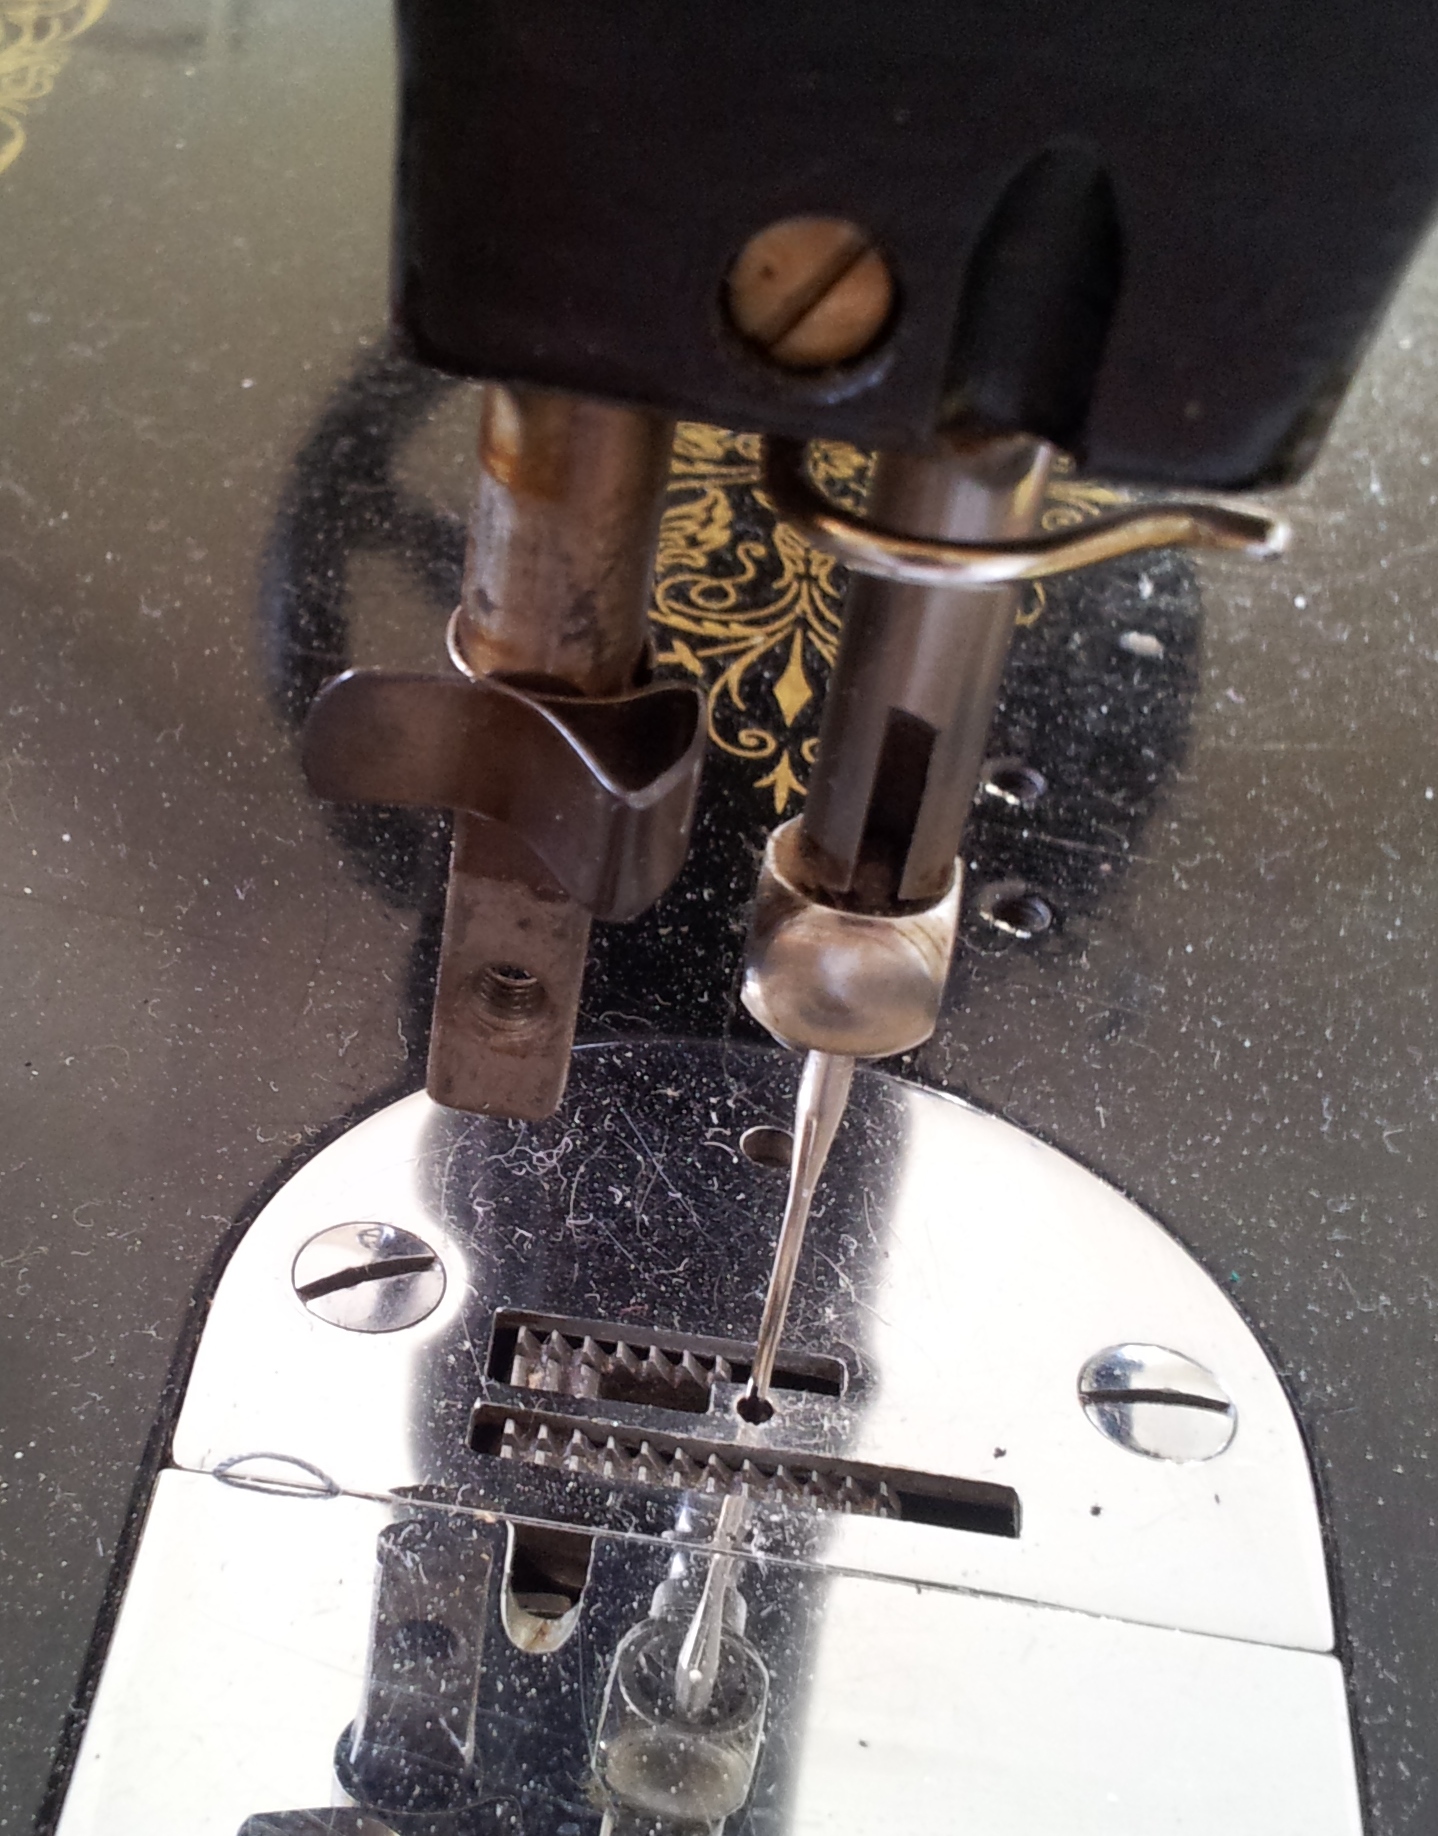
Before cleaning under throat plate
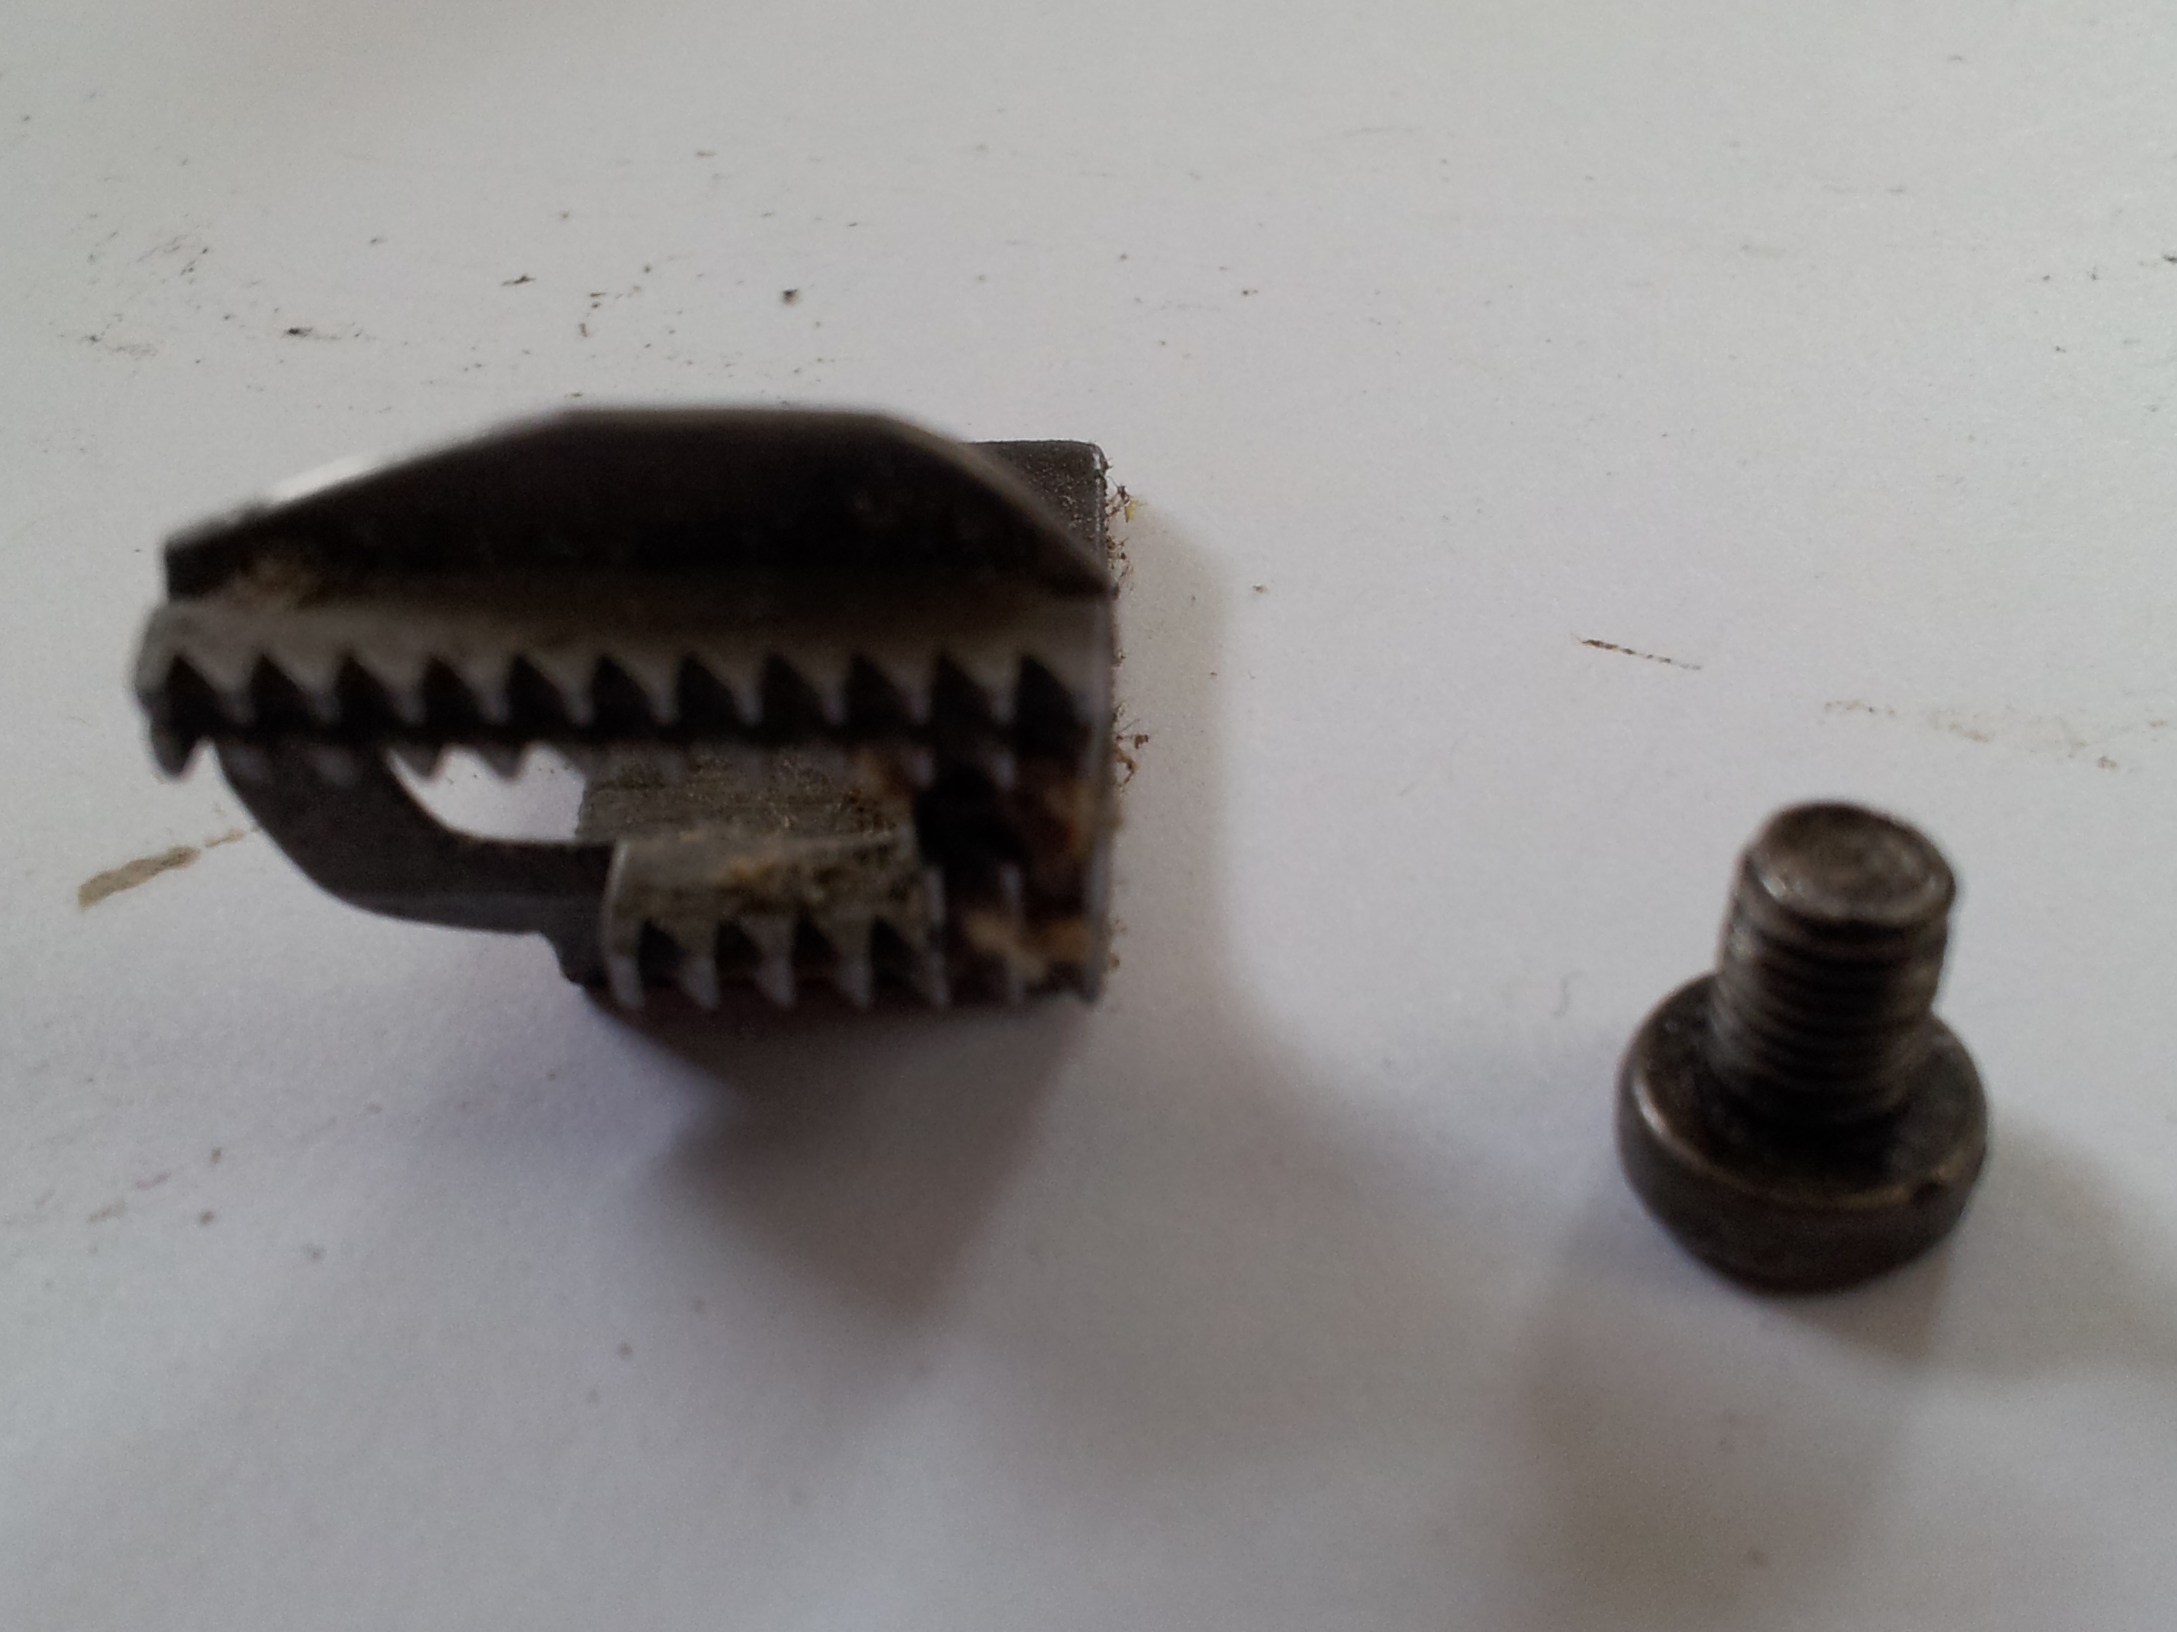
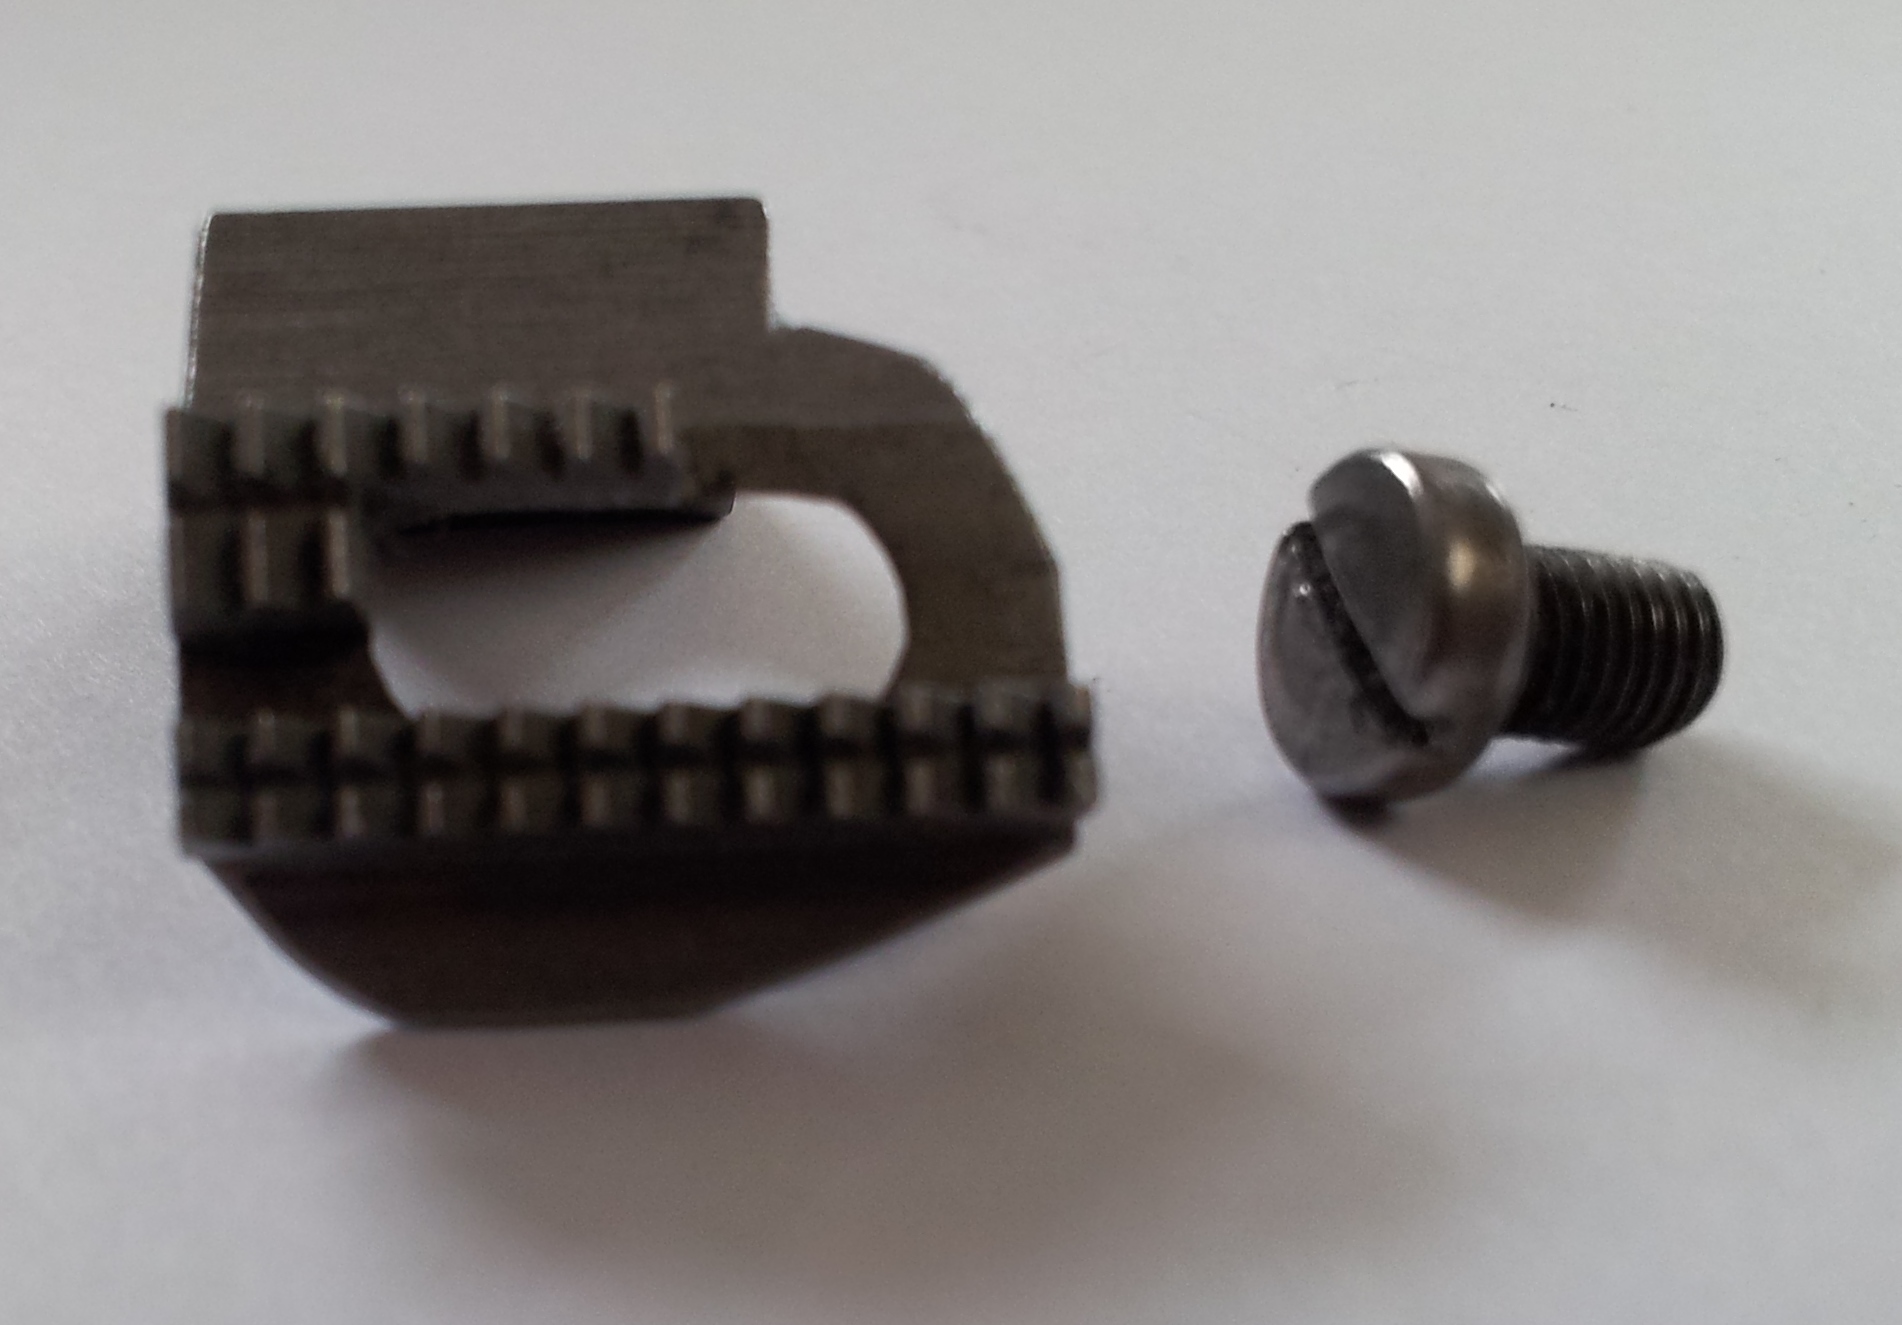
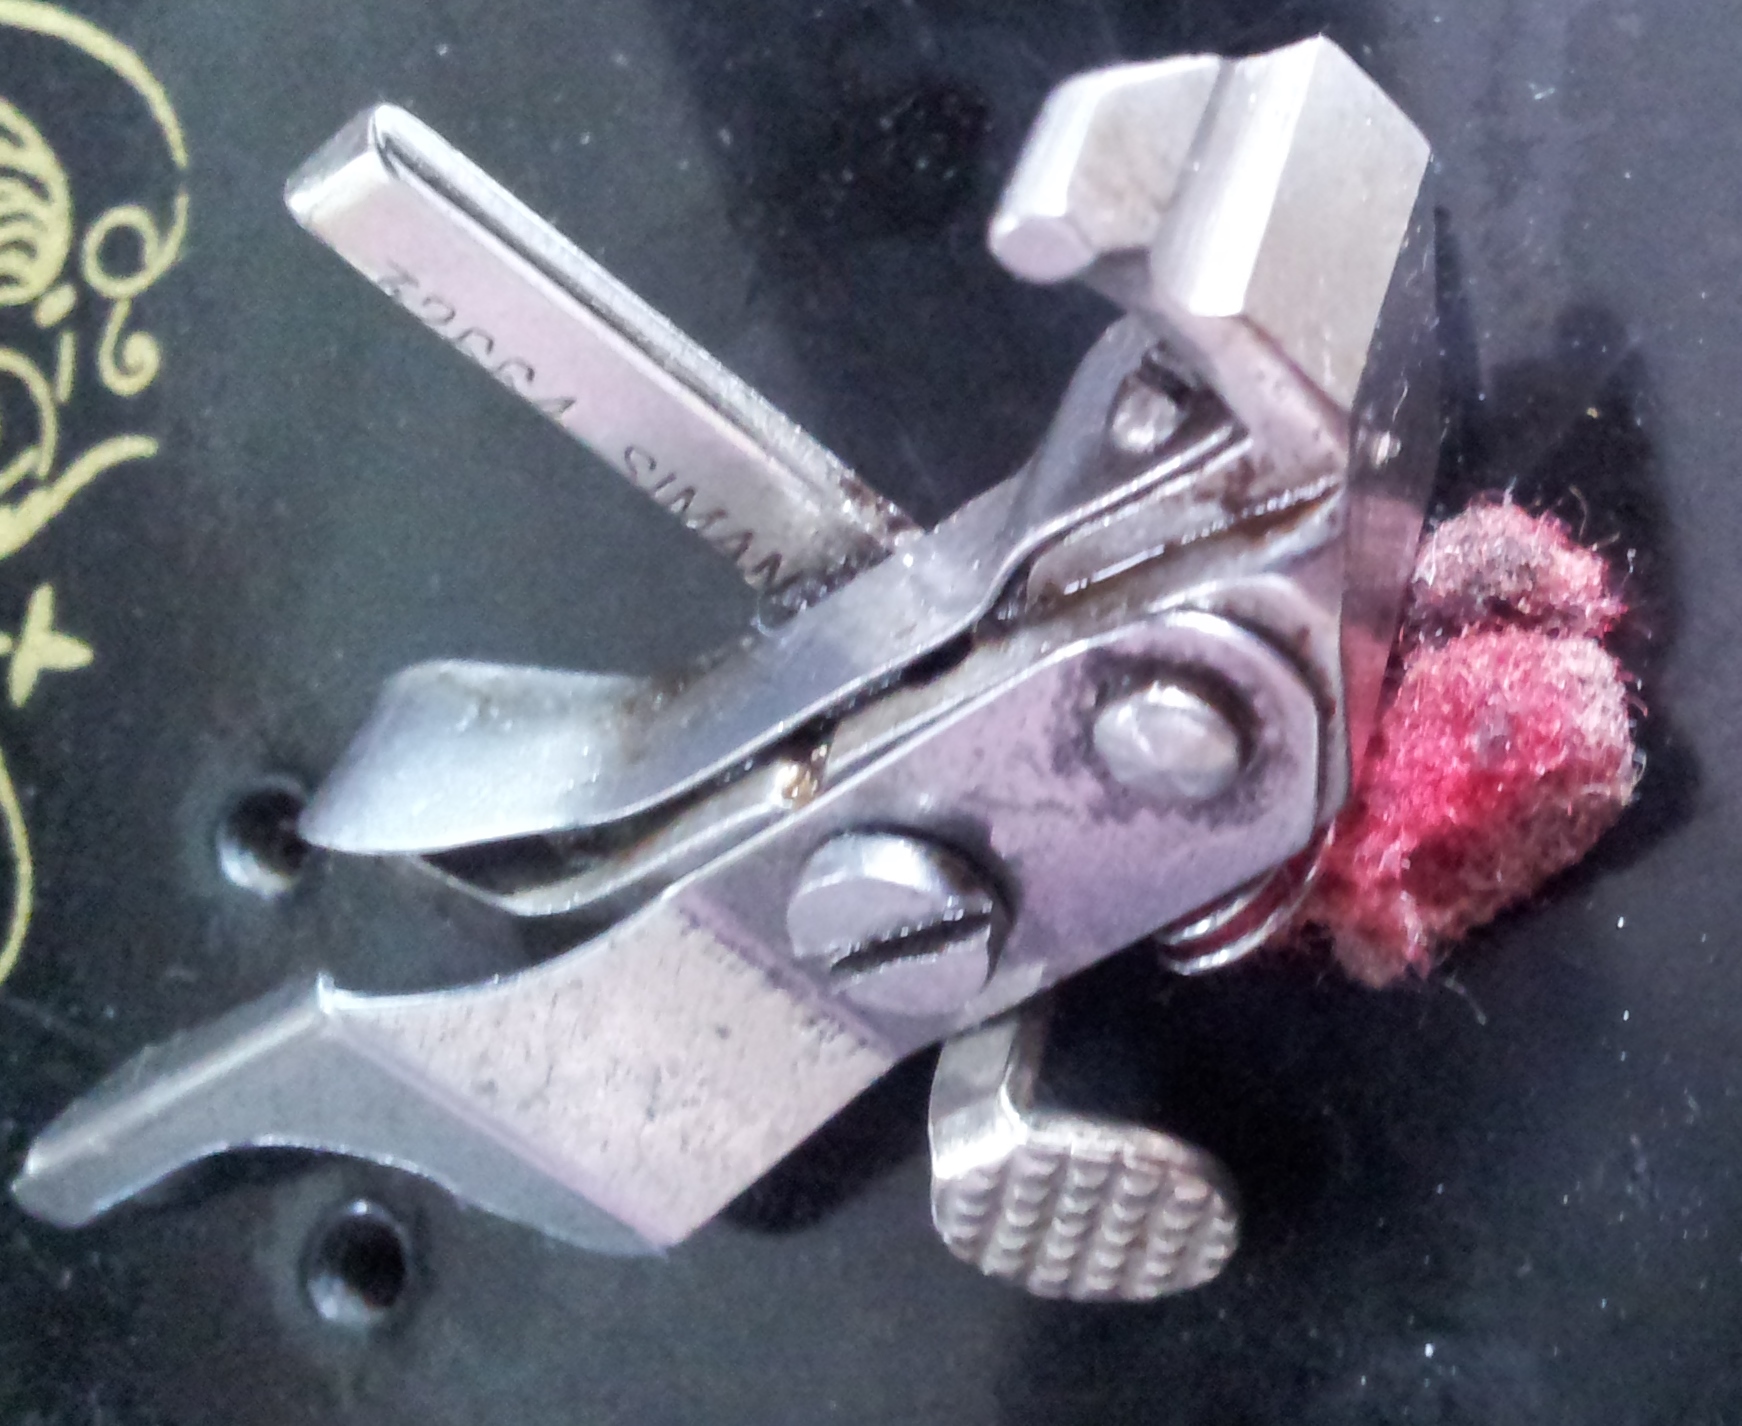
With the throat plate removed I took the bobbin out, under the machine was a screw that released the feed dogs (the screwdriver is pointing to it in the picture) so I could remove the fluff and polish them up.

Position of Feed Dog Screw under Bed
Feed Dog before and after cleaning
As I started to gain confidence in taking my machine apart I became a bit ‘unscrewing’ happy, forgot all I had read and took out a key screw that all Singer Manuals and Guidance say not to touch “Under no circumstance must the screw in latch B be loosened as this would put the stitch forming mechanism out of adjustment.” I tried to warn you that this isn’t a how to guide!
The red tweezers in the photo below are pointing to the screw I am talking about. Opps!
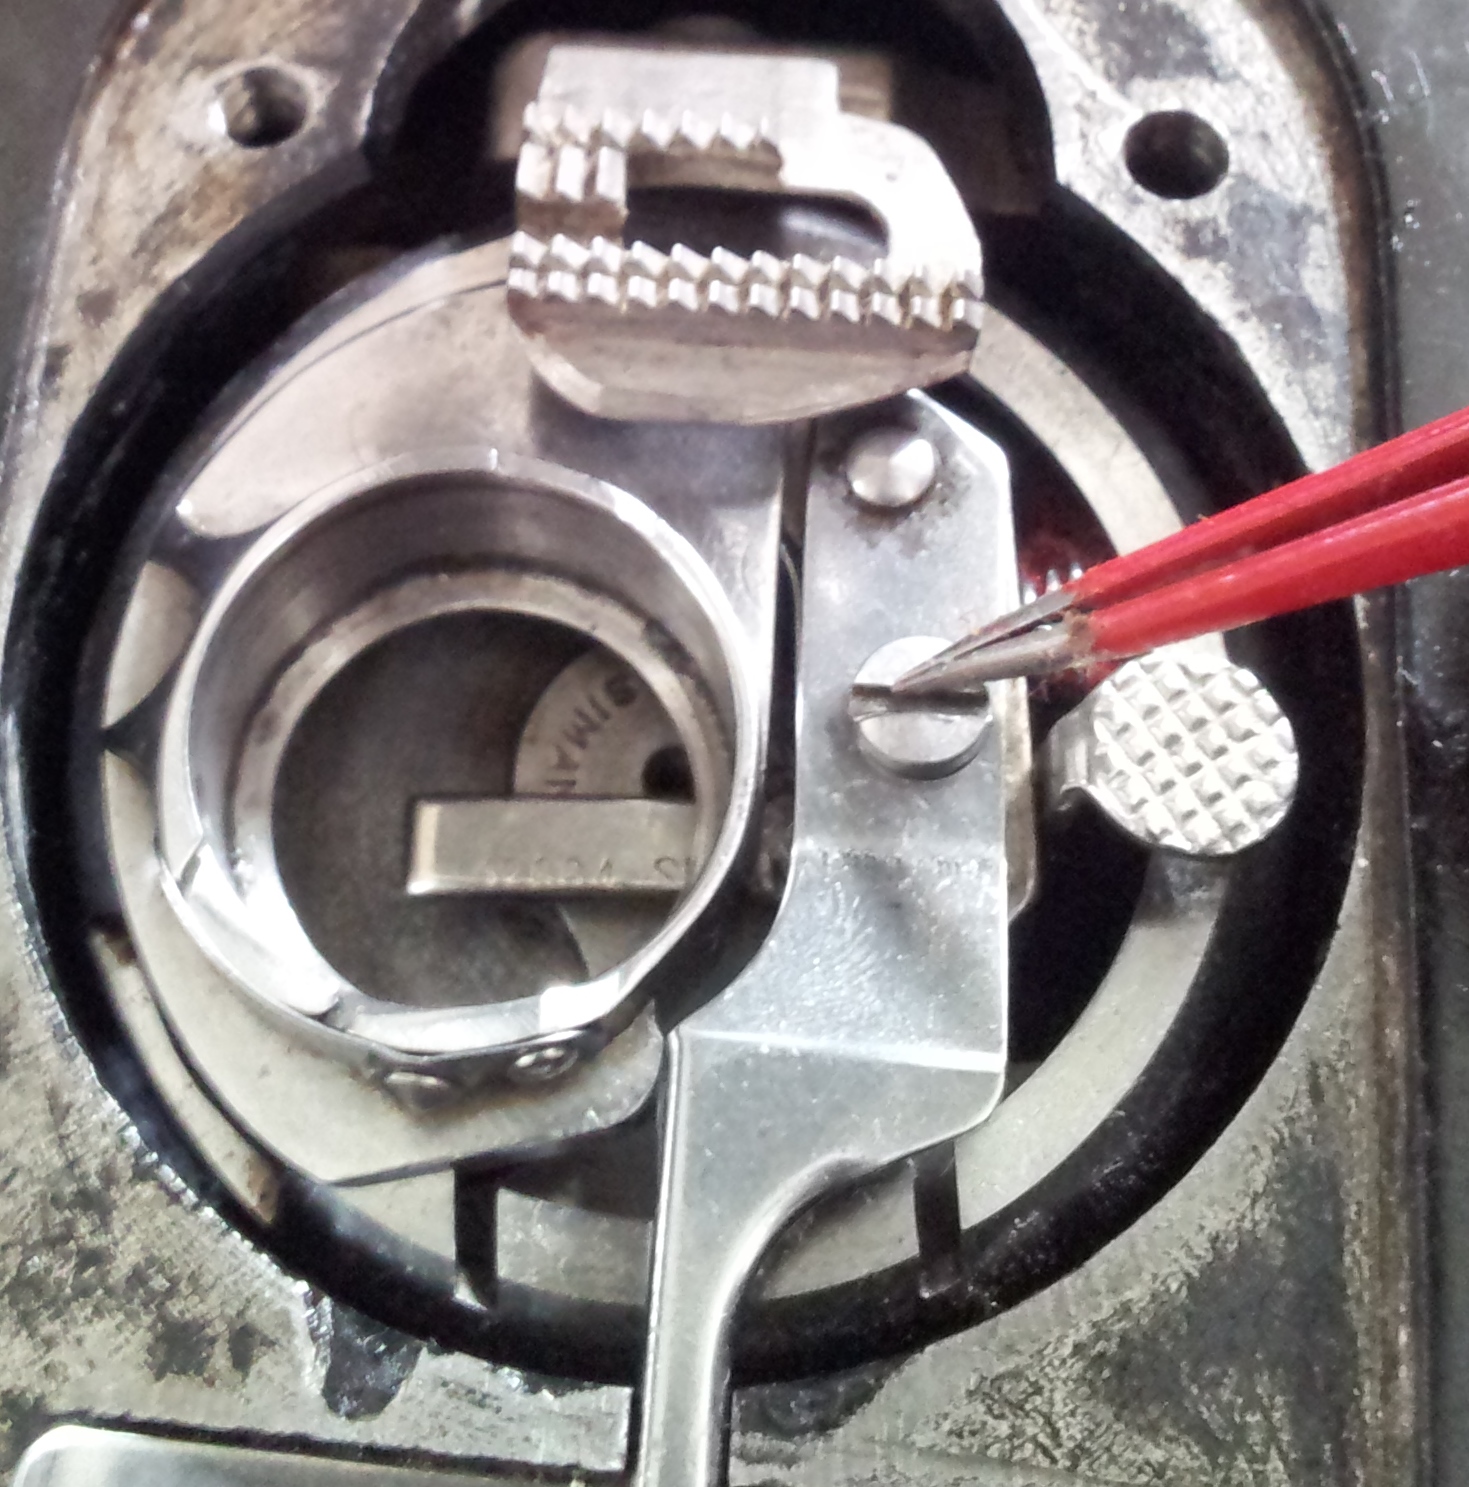
Do not touch this screw
So, when it came to taking any part of your machine apart, do your research well and follow it. One website I found pretty useful on the bobbin area assembly was this one: archaicarcane
So here are some of my removed parts.
Bobbin release and latch – the red felt is really important – DO NOT REMOVE.
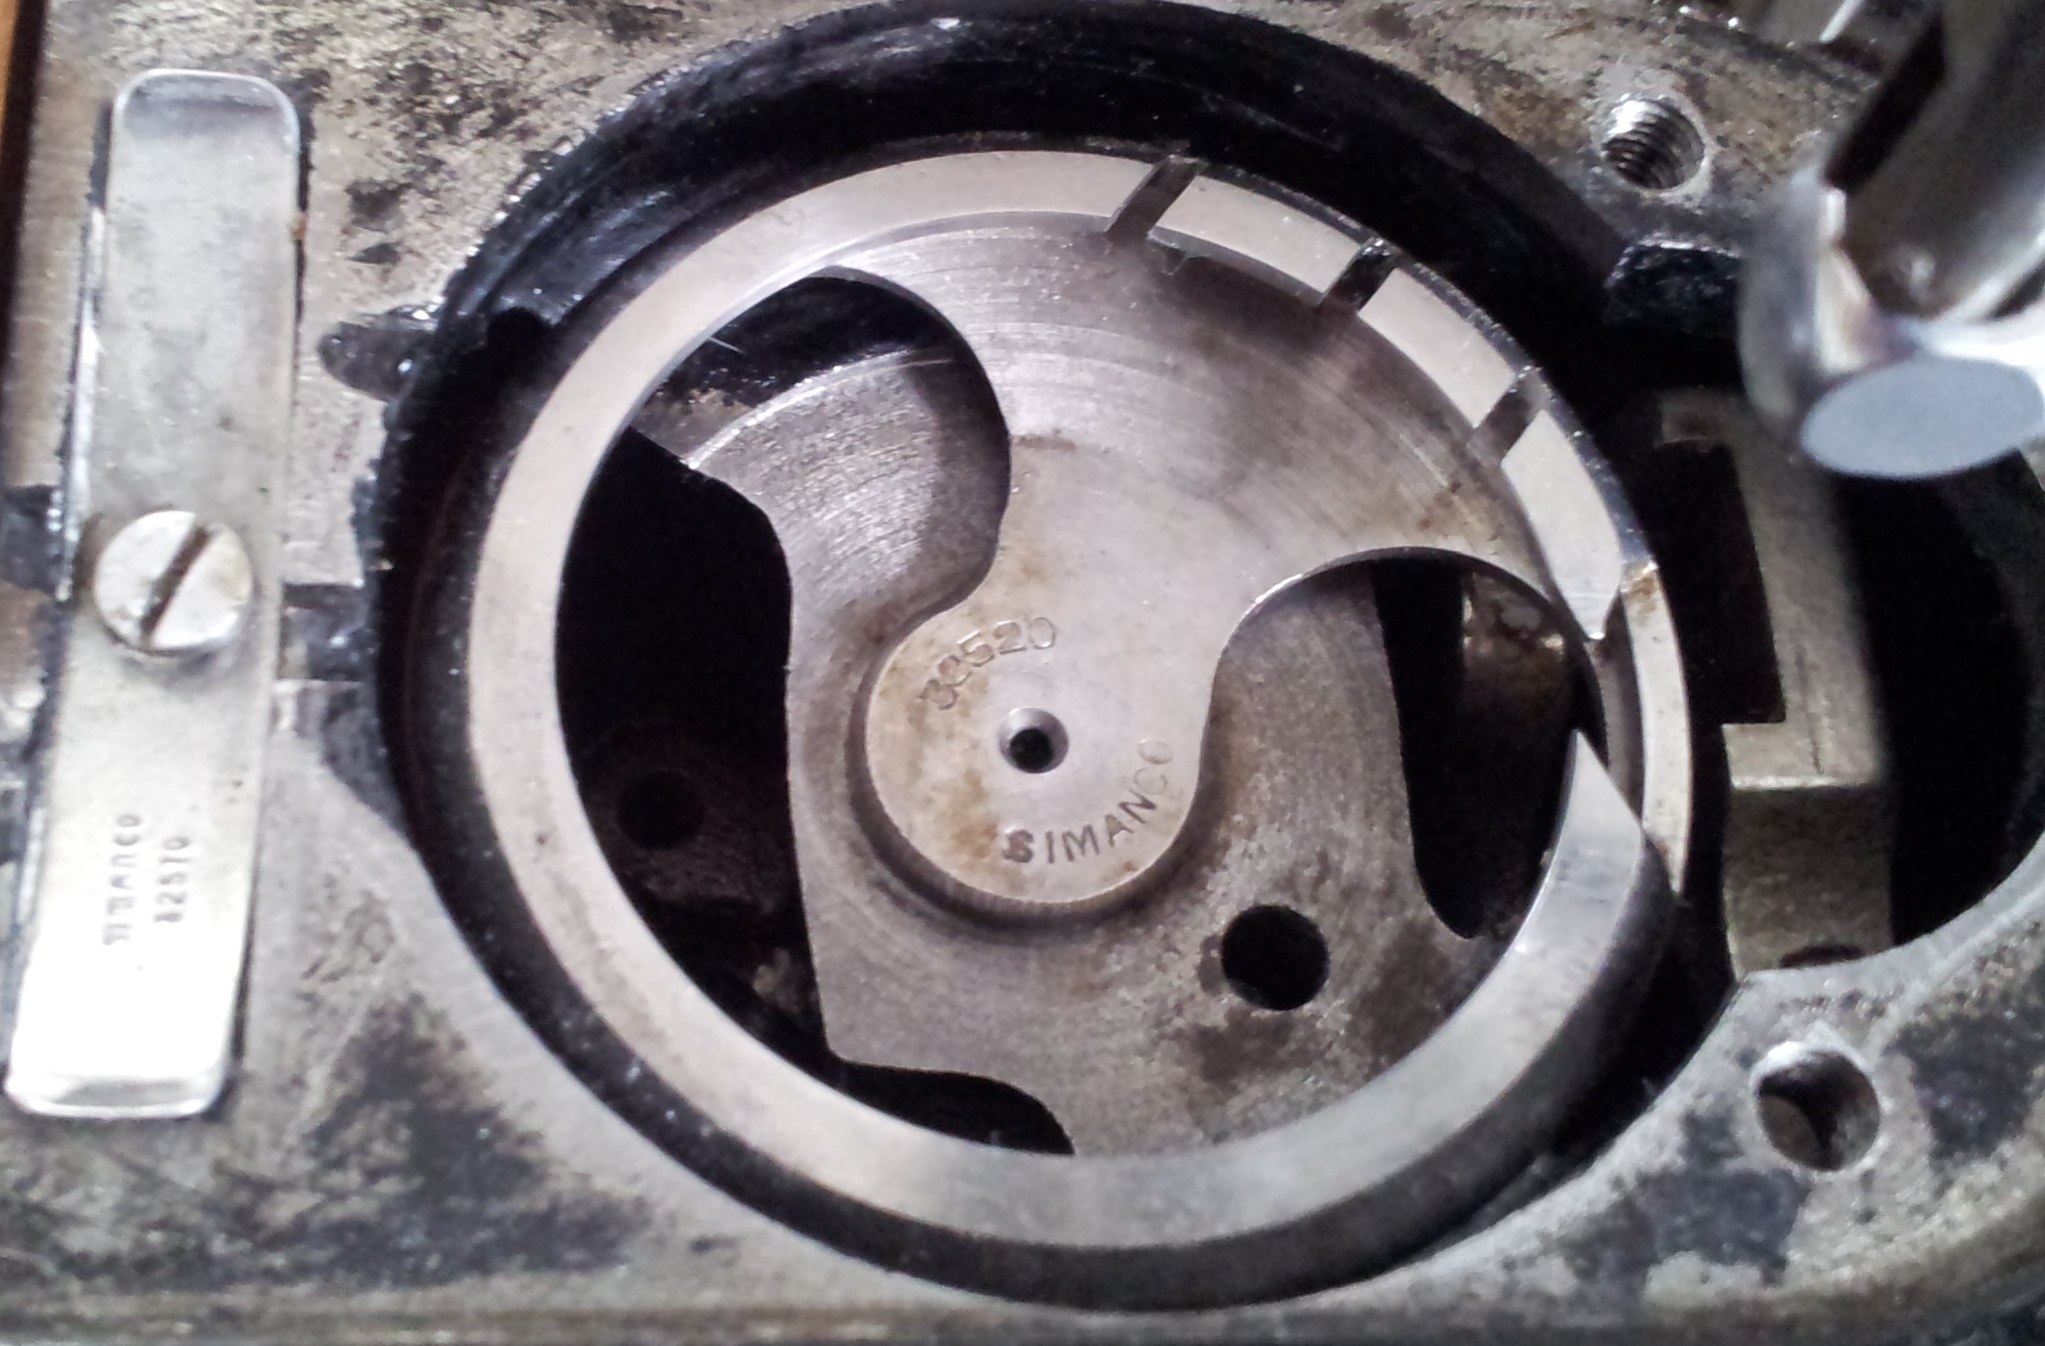
Inside of machine with Bobbin Case removed
Once all fluff / grim was removed and polished it was time for the sewing machine oil – my approach was to oil every metal to metal friction joint.
After working on the bobbin and face plate area, I moved to the tension discs, handle and bobbin winder. After my latch screw error (luckily all is not lost as my machine is still stitching beautifully) I wasn’t confident enough to remove the handle or bobbin winder completely so I polished what I could with cotton buds and a soft cloth. Another time I might check out one of the sources I mentioned above or The Vintage Singer Sewing Machine if I wanted to take on the challenge!

And here she is Voila! My cleaned and threaded beauty.
That just leaves me with this box of fabulous sewing machine attachments that came with Little Miss Susie.
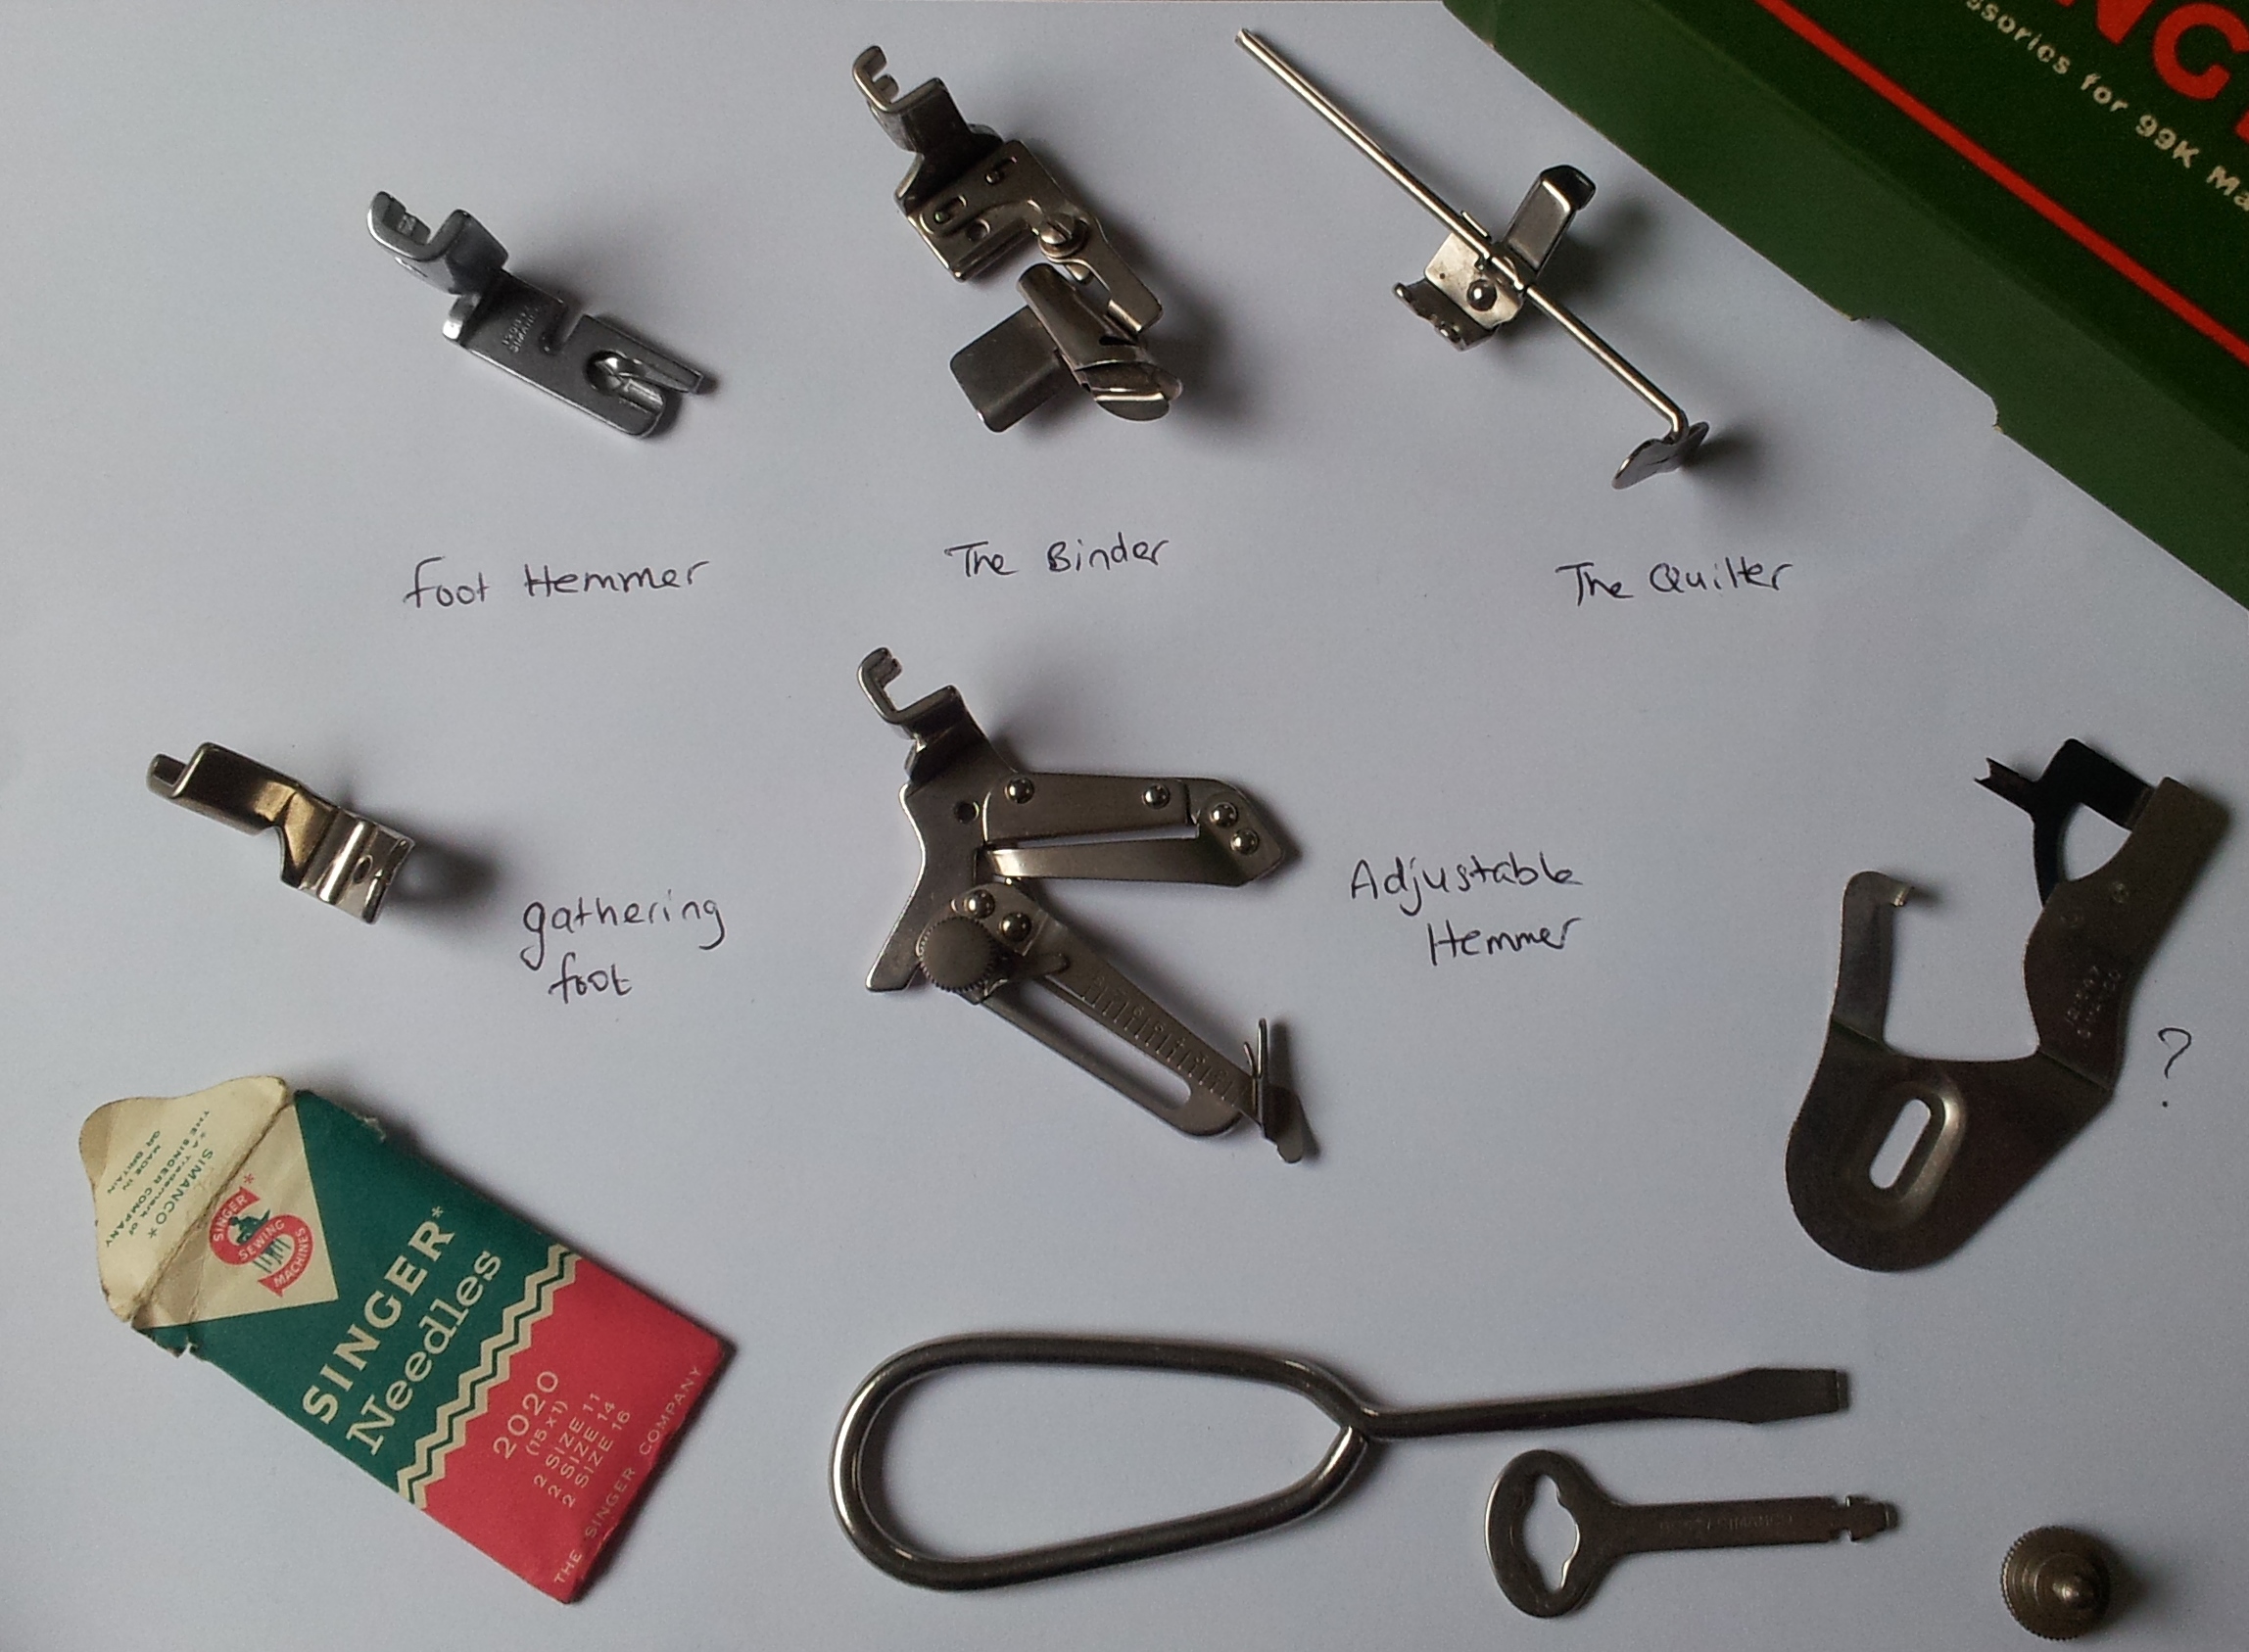
Singer Sewing Machine Attachments
What do they all do? How do you use them? How do they compare with today’s equivalents? If like me you are interested to find out send me a comment!

The mysterious part on RHS of picture with a ? is called an ‘underbraider’. It’s used for attaching braid to garments but unlike modern ‘braiders’ this requires that the good side of fabric & braid is laid face down and then stitched. Excelled demo given by lady on YouTube. Just search ‘underbraider foot’ sometimes it shows women doing hair braiding !!.
Good luck.
Thank you for this generously shared very helpful advice. I’ve just been gifted a Singer 66K, built at Singer’s Clydebank Factory, Glasgow, Scotland, with registration number F617079 (January to June 1910). It needs a lot of TLC! Has many attachments and clearly was well used for many years, which is nice, I’m determined to restore it as well as I can after reading your post.
They are beautiful machines, so happy that someone has given you one too. 🙂
I accidentally loosened that “DO NOT LOOSEN” screw as well. Did you notice any problems with the machine due to loosening that screw? Also do you happen to know how to correct any issues that occur due to the screw being loosened? Thanks so much!!
I did exactly the same with the ‘do not loosen’ screw. I put it back as best I could and the machine seemed to be fine. 🙂
I have just got a 99k , 1934 dated and found your amazing videos on You Tube. Yesterday I gathered all the essential bits and bobs to begin cleaning her… Lizzie! Up! She is in amazing condition and even the little bit of polishing and fluff removal I gave done seems to be making her glow!! One question, why is the red fluff important? I saw it and did start to remove it! Good job you’re here! Many,many thank yous!! X
Your machine sounds beautiful! I’m not really sure why the felt is important, I’m guessing it is something to do with how the spring works. You’ll have so much fun using her. X
The red fluff is a felt oil reservoir. It should be kept moist with oil because it is there to lubricate the movement of the bobbin mechanism. This is how it works on a long bobbin machine – the same principle applies with the 99K, it just looks completely different.
http://lizzielenard-vintagesewing.blogspot.co.uk/2013/02/oiling-shuttle-race-on-long-bobbin.html
Thank you so much for the info and for taking the time to respond. It’s so good to be able to share our knowledge. I’ll make sure to oil the felt now too. X
I have now finished cleaning, polishing and oiling and have wound the bobbin and threaded the machine- all done following your amazing videos! The machine actually sews, the stitches are beautifully formed above and below the fabric but seem too tight and are slightly gathering the fabric as it stitches. I’ve adjusted the upper tension discs with no improvement and wondered if this is a bobbin tension problem? Yet the stitches are perfect as I said earlier. Any help and advice would be gratedully received.
Many thanks
Angela
Have you tested out your bobbin’s tension? It could be worth doing that (I normally do the hold the bobbin in its case by the thread to see how it ‘runs’. Otherwise, it could even be that the top thread isn’t quite in all the grooves or thread guides. Sorry for the delay in responding – Ive only just seen your comment. x
Hello. I am trying to get a machine my grand mother gave me years ago back in working order. I have read several places there should be a spring with some red felt in the bobbin race area. I see you say “do not remove it”. Well this Singer Spartan 192K does not have it. Do you know how to put one back in?
Thanks,, Crystal
Awesome stuff – I have just picked up today a 1947 Model 99K (serial number EE551656) and will be bookmarking this page so I can go through your steps to clean and polish it up. I just need to find the tools you used in New Zealand …
Thanks for your message, really happy my post helped. X
I have a 99k Singer purchased from a thrift shop anyway I can purchase the attachments for my machine. All it had was the needle I purchased a bobbin already.
I have a 99k too, is yours a treadle/ hand crank / electric? They are really beautiful to look at and use. You’ll love it. X
I’ve also made the cardinal mistake of turning this screw. How do I rectify this?
When I turned mine by mistake I tried to turn it back to where it was, then tried the machine. It seems to be ok. Otherwise, there are some really good online guides and support sites which I’ve mentioned in my blog on the featherweight post. X
Oh dear. I removed that screw too! Hope it’s all ok! I found my Singer 99 yesterday. I already own a beautiful Frister Rossman which I’ve not been brave enough to tackle (and it’s really grubby) I can’t wait to finish the overhaul and get sewing!
Your Frister Rossman sounds beautiful. I would love to see a picture of her! X
Having just purchased a 1918 Singer 99, and then a few days later purchasing an 1891 Singer VS3 Model 28 that is going to need major refurbishing/restoring I am very interested in learning what all those attachments are for and how to use them. You see, neither of my new “old” girls did not come with manuals. This is truly an addictive venture… who knew?! LOL!
Wow! They are so addictive! Send us some pics of your restoration in progress – would love to see!
Pingback: The Singer Featherweight 222K – Simply a Sewing Sensation | thestitchsharer
The ? is an underbinder. Not sure what it is for yet but I will have fun finding out.
Thank you so much for sharing that. I can get busy looking it up now!X
It’s an underbraider. Easiest thing is to watch my video.
Thanks for sharing. Great video. X
Hello Stitch Sharer,
Lovely to find a blogger in the same country working on vintage machines. Your 99K looks a really smart machine. You might be interested in my blog and Youtube channel – I have been putting information online about vintage machines for the past couple of years. If you put an electric machine in front of me I would run away in fright – strictly hand machines and treadles for me.
Love,
Muv
Great to hear from you and so pleased to of found your blog. I love the Pansy Doll Quilt you have recently made. It looks amazing.
I’ve inherited my Mum’s old Singer sewing machine. I love it, as it’s the machine I learned to sew on. The serial number is EF217437, so she’s one of the same batch as Little Miss Susie. It does look slightly different though – she has a different wheel. How does your’s work? I mean, is it manual or electric? Mine is electric, but it may have been converted from a hand-wheel at some point. There is a belt around the wheel and it’s operated by a metal handle that juts out from the base and you press with your knee. Sorry – bit hard to describe. Anyway, I’m really glad I found your blog as my machine is in need of a little TLC and I was a bit nervous about taking it apart. I’ll definitely have a go this weekend. Thanks for the great advice !!!
Your mum’s machine sounds really interesting. My little old Suzie is a manual 99K hand operated model. x
99k-13 leg bar operated mines EG398325
and yes I did nearly pull the red felt out
Thanks for the above – I have seven old machines (I know, I know, not sure what came over me but some of them were from elderly family members and I didn’t have the heart to give them away) all sitting waiting to be cleaned and loved just that little bit more. Your references were very helpful, I have been wondering how to start and that has given me a bit of an incentive. cheers.
You’re welcome. X
Your vintage Singer is absolutely beautiful. I need to clean and restore my Nana’s machine when it arrives. This was really encouraging!
Thank you. X
Hi! I have enjoying reading your blog so I nominated you for several awards. Find out details here:
crochetwithpassion.wordpress.com/2013/06/05/thank-you-for-naminated-me/
Thank you so much for the awards and congratulations to you for winning them as well. I would love to add your blog name to the award section on my about me page as a sign of thanks (it takes me forever to get onto passing them on!) is that ok with you?
What a beauty! Well worth the effort to clean 😀
Thank you – she is a total beauty. x
I would actually like to know. I am a fan of “newer isn’t always better”.
She’s beautiful! I have a friend on facebook who had gotten a hold of a Singer just like that one. He’s a fashion designer and sews A LOT! So when I saw yours, I thought to myself for a brief moment, “I saw this already”. Heh heh!
Thanks for taking the time to send me your comment, will try and write some posts on the attachment comparison. X
I have three or four (must check) old Singers but have never used any of them. I must get round to it one day…
I found your post very interesting – prior to it I had found most of my info on the Tools for Africa site.
Thanks for the tip on the website. Will be checking it out. X
Gorgeous machine, I love that intricate face plate. My 1959 model is much less ornate, but the ability to service it at home is wonderful! You did a lovely job, look at that glow 🙂
Wow, lucky you with all the extra feet! The gathering foot makes ruffles, the binder foot is for adding bias tape. The “?”, my best guess is a button hole foot. There are loads of nice how to videos on YouTube for using the feet. Not much has changed with machine feet over that 60 years, so the videos for newer parts will be really useful.
Thank you for your lovely feedback. Will be checking out those YouTube videos. X
I just got my Mother in law’s Singer(EG369994 ). Needs cleaning and oiling plus replacing bobbin rubber wheel and rubber band for large wheel to operate machine.
She’ll be a real beauty when you’ve sorted her all out. X
You must be a mind reader, I was going to search the web today for just this subject topic. Thanks for the post it will be very helpful today.
Thanks for a great tutorial. As the proud new owner of 3 antique singer sewing machines, I will have to tackle cleaning them soon. I am going to make sure that I don’t touch that screw as I wouldn’t be as lucky as you. Guaranteed my effort would result in messed up stitching and a call for a mechanic.
You’re welcome. Which models have you got? Im finding vintage sewing machines so addictive!